
AI-Powered SharePoint Timesheet SoftwareComplete Guide for Modern Teams
Managing employee hours shouldn’t feel like rocket science. Let’s explore how AI-powered SharePoint timesheet solutions transform time tracking from a dreaded chore into an effortless workflow.
_mVFFaHUZhS.webp)

Why Modern Businesses Choose SharePoint Timesheet Solutions
Remember the last time you chased down team members for their weekly hours? That frustration ends here.
SharePoint timesheet systems have evolved dramatically. Gone are the clunky spreadsheets and forgotten paper forms. Today’s intelligent platforms blend seamlessly with Microsoft’s ecosystem, offering businesses a centralized hub for tracking work hours, project allocation, and resource management.
Modern AI-enhanced SharePoint timesheet platforms solve these pain points by:
- Automating repetitive data entry tasks
- Reducing timesheet approval cycles significantly
- Minimizing payroll errors through intelligent validation
- Providing real-time visibility into project budgets
What Makes AI-Powered Solutions Different?
Traditional time-tracking feels like punishment. Employees forget entries, managers drown in approval queues, and finance teams scramble during payroll week.
AI transforms this experience completely.
Smart algorithms learn your team’s patterns. They suggest entries based on calendar events, detect anomalies automatically, and even predict project overruns before they happen. Organizations using AI-powered time tracking see significant improvements in month-end closing cycles and overall efficiency.
Who Benefits Most?
Professional Services Firms: Law offices, consulting agencies, and accounting practices bill clients by the hour. Accurate tracking directly impacts revenue.
Project-Based Organizations: Construction companies, marketing agencies, and IT consultancies need granular visibility into where resources go.
Enterprise Teams: Large corporations with complex approval hierarchies require robust workflows and compliance features.
Remote-First Companies: Distributed teams spanning multiple time zones need accessible, cloud-based solutions.
The Microsoft Advantage
Why build on SharePoint specifically? Your organization likely already uses Microsoft 365. Approximately 89% of Fortune 500 companies rely on Microsoft’s ecosystem.
This means:
- Zero additional login credentials for employees to remember
- Native integration with Outlook, Teams, and Project
- Enterprise-grade security protecting sensitive payroll data
- Familiar interface reducing training time
.webp)
Microsoft Teams Timesheet: Complete Guide for Smarter Work Management
The Hidden Cost of Poor Time Tracking
Let’s talk numbers that keep CFOs awake at night.
Revenue Leakage: Services firms lose an average of 12% of billable hours to track errors. For a mid-sized consultancy billing $5 million annually, that’s $600,000 vanishing into thin air.
Employee Frustration: 68% of workers cite timesheet hassles as a top administrative annoyance. This frustration fuels turnover in competitive talent markets.
Project Budget Overruns: Without real-time tracking, 73% of projects exceed budgets by an average of 27%.
Can your organization afford these losses?
Upgrade to AI-Powered Time Tracking
What Separates Great SharePoint Timesheet Software From Average Tools
Not all time-tracking solutions deserve your investment. Let’s examine the must-have capabilities that deliver actual ROI.
1. Intelligent Time Entry
The Problem: Employees hate filling out timesheets. They procrastinate until Friday afternoon, then guessat Monday’s activities.
The Solution: AI-powered auto-suggestions that learn individual work patterns.
Modern SharePoint timesheet platforms analyze your calendar, email activity, and collaboration tools. When you open your timesheet, entries are pre-populated based on:
- Scheduled meetings from Outlook
- Document editing sessions in SharePoint
- Chat conversations in Teams
- Historical patterns from previous weeks
You simply review and approve rather than starting from scratch. This feature alone reduces entry time by more than half.
2. Mobile-First Design
Yourfield technicians, sales representatives, and remote consultants aren’t chained to desks. They need to log hours from:
- Job sites with spotty connectivity
- Client offices between meetings
- Home offices during flexible schedules
- Transit during commutes
Top-tier solutions offer native iOS and Android apps with offline capabilities. Changes sync automatically when connectivity returns.
Mobile-enabled time tracking increases submission rates significantly, ensuring more accurate and timely data collection.
3. Project and Task Hierarchy
Flat time entry creates reporting nightmares. You need hierarchical structures that mirror how workactually happens:
Client → Project → Phase → Task
Example structure:
- Client Account (Client)
- Digital Transformation Initiative (Project)
- Discovery Phase (Phase)
- User research (Task)
- Competitive analysis (Task)
- Design Phase (Phase)
- Wireframing (Task)
- Visual design (Task)
This granularity enables precise billing, accurate forecasting, and detailed profitability analysis.
4. Customizable Approval Workflows
Every organization has unique approval processes.Your SharePoint timesheet solution should accommodate:
- Single-level approvals: Direct manager only
- Multi-stage reviews: Manager → Project lead → Finance
- Matrix approvals: Both functional and project managers
- Conditional routing: Different paths based on hours, project type, or employee level
Automated reminders keep approvals moving. Escalation rules prevent challenges when approvers are unavailable.
5. Real-Time Analytics Dashboard
Data trapped in timesheets helps nobody. Powerful visualization turns raw hours into actionable insights:
For Project Managers:
- Burn rates compared to budgets
- Resource allocation across initiatives
- Team utilization percentages
- Forecasted completion dates
For Finance Teams:
- Billable versus non-billable ratios
- Revenue recognition tracking
- Labor cost analysis
- Invoice preparation data
For Executives:
- Departmental productivity trends
- Profitability by client or project
- Capacity planning metrics
- Overtime patterns
Leading platforms offer customizable dashboards where stakeholders see exactly what matters to them.
6. Expense Integration
Time and expenses gohand-in-hand. Employees shouldn’t juggle separate systems for hours and receipts.
Integrated expense management allows:
- Attaching receipts directly to timesheet entries
- Associating costs with specific projects
- Applying per diem rates automatically
- Enforcing approval policies consistently
This integration reduces expense report processing time substantially, streamlining financial operations.
7. Compliance and Audit Trail
Regulations like FLSA, DCAA, and SOX impose strict record-keeping requirements. Your system mustmaintain:
- Complete edit history showing who changed what and when
- Timestamp records proving when entries were submitted
- Approval documentation demonstrating proper authorization
- Data retention policies meeting legal requirements
Audit-ready reports save thousands in external audit fees and protect against regulatory penalties.
8. AI-Powered Anomaly Detection
Humans make mistakes. AI catches them automatically.
Smart algorithms flag:
- Unusual hour patterns (40 hours logged on a single day)
- Duplicate entries across projects
- Missing time for scheduled workdays
- Budget threshold breaches before they become crises
These alerts reduce payroll errors dramatically, catching issues before they reach finance departments.
9. Natural Language Processing
Imagine describing your day in plain English rather than clicking through dropdown menus:
“Spent 3 hours on client presentation and 2 hours in team planning meeting”
The system parses this sentence, identifies the project, categorizes activities, and creates proper timesheet entries.
Early adopters report significantly faster entry completion using conversational interfaces.
10. Predictive Resource Planning
Historical data becomes your crystal ball. AI analyzes past projects to forecast:
- How many hours similar initiatives will require
- Which team members have relevant experience and availability
- When challenges are likely to occur
- What budget to allocate realistically
This foresight improves project estimation accuracy substantially, helping organizations bid more competitively.
Track time smarter and boost team productivity with Timesheet Software.
Best SharePoint Timesheet Software: Comprehensive Comparison
Choosing the right solution requires understanding how different platforms stack up. Here’s an honest comparison of leading SharePoint timesheet software options available in 2026:
Software | Best For | Key Strength | Mobile App | AI Features |
Timesheet 365 | Standard – Enterprise M365 users (10-100,000+) | AI predictions + Power BI native | ✓ | ✓ |
Timesheet Pro 365 | SharePoint teams (50-5,000) | Teams/Outlook integration | ✓ | ✗ |
Office 365 Timesheet | Budget-conscious M365 (10-1,000) | SharePoint lists native | Web only | ✗ |
TimeCamp | Freelancers & small teams (1-500) | Automatic time tracking | ✓ | ✗ |
Replicon | Large enterprises (500-50,000+) | DCAA/SOX compliance | ✓ | Limited |
Harvest | Small agencies (5-200) | Invoice integration | ✓ | ✗ |
Toggl Track | Flexible teams (1-unlimited) | Simplicity & reporting | ✓ | ✗ |
Clockify | Budget users (unlimited) | Free tier + unlimited users | ✓ | ✗ |
TSheets (QuickBooks Time) | QuickBooks users (5-500) | QuickBooks integration | ✓ | ✗ |
Timely | Automatic tracking fans (5-500) | Memory-based tracking | ✓ | ✓ |
Understanding the Comparison
Timesheet 365 Strengths:
- Complete Microsoft 365 ecosystem integration means your data flows seamlessly across Teams, SharePoint, Power BI, Outlook, and Dynamics
- Advanced AI capabilities including predictive analytics, natural language processing, and intelligent anomaly detection
- Native Power BI dashboards provide executive-level insights without additional tools
- Enterprise scalability supporting organizations from 10 to 100,000+ users without architecture changes
- Comprehensive compliance meeting DCAA, SOX, FLSA, and industry-specific requirements
Competitor Strengths:
Timesheet Pro 365 is compatible with SharePoint and is simple to install, which is why it is suitable when a team needs a fast implementation and strong integration with Microsoft.
Office 365 Timesheet is a good offer to companies that are already using Microsoft 365 and it provides basic timesheet tools at a reduced cost.
TimeCamp is also very useful in automatically tracking time of freelancers and small teams, and has desktop apps that can automatically track which applications you use.
Harvest boasts clean and easy-to-use screens and powerful invoicing features that most creative agencies and design firms adore.
Toggl Track is very flexible and easy to track, allowing teams to begin immediately without a difficult setup.
Clockify allows an unlimited number of users to use it free of charge, and therefore, startups and small businesses can easily experiment with time tracking.
Replicon provides multinational companies with enterprise-level tools, high compliance, and global workforce management.
TSheets is compatible with QuickBooks and it also includes GPS tracking and job cost tracking, which is excellent in field service companies.
Timely Knowledge workers no longer have to enter the time manually; Timely automatically logs the time you spend on the apps and websites you visit.
Making Your Choice
Consider these decision factors:
Choose Timesheet 365 if you:
- Already use Microsoft 365 extensively
- Need advanced analytics and predictive insights
- Require complex approval workflows
- Manage large teams or multiple projects
- Need enterprise-grade compliance
- Want AI-powered automation
Choose alternatives if you:
- Have minimal Microsoft 365 investment
- Need only basic time tracking
- Prefer standalone specialized tools
- Have very tight budgets
- Use competing ecosystems (Google Workspace, Salesforce)
- Prioritize specific features like GPS tracking or automatic desktop monitoring
The honest truth: Each solution serves different organizational needs. Timesheet 365 excels for Microsoft-centric enterprises needing sophisticated features. Other solutions offer specialized capabilities that may better fit specific use cases, budgets, or technical environments.
Choosing the Best SharePoint Timesheet Step-by-Step
The market offers dozens of options. How do you separate genuine solutions from overhyped disappointments?
Step 1: Assess Your Requirements
Before scheduling demos, document your specific needs:
Organizational Size:
- Small teams (under 50) need simplicity over complexity
- Mid-market companies (50-500) require scalability
- Enterprises (500+) demand robust governance
Industry Specifics:
- Professional services need client billing features
- Government contractors require DCAA compliance
- Healthcare organizations must maintain HIPAA standards
Integration Priorities:
- Which systems must connect? (ERP, accounting, project management)
- Do you need API access for custom integrations?
- Are pre-built connectors available?
Budget Constraints:
- What’s your per-user monthly budget?
- Can you afford implementation services?
- Do you need ongoing support contracts?
Step 2: Evaluate Vendor Stability
Technology partnerships span years. Vet potential vendors carefully:
Company Background:
- How long have they operated? (Startups carry higher risk)
- What’s their customer retention rate?
- Do they have financial backing?
Product Maturity:
- Is this their core offering or a side project?
- How frequently do they release updates?
- What’s on their development roadmap?
Customer Base:
- Do they serve organizations like yours?
- Can they provide relevant references?
- Will they connect you with existing customers?
Step 3: Prioritize User Experience
The most feature-rich platform fails if employees won’t use it.
Intuitive Interface:
- Can new users navigate without extensive training?
- Does it follow modern design principles?
- Is the mobile experience equally polished?
Performance Standards:
- Do pages load quickly even with large datasets?
- Does it handle peak usage without slowdowns?
- Are there annoying lags or glitches?
Accessibility Compliance:
- Does it meet WCAG 2.1 standards?
- Can users with disabilities navigate effectively?
- Are keyboard shortcuts available?
Step 4: Test Integration Capabilities
Your SharePoint timesheet platform must play nicely with existing tools.
Microsoft Ecosystem:
- Azure Active Directory for single sign-on
- Power BI for advanced analytics
- Dynamics 365 for ERP integration
- Outlook for calendar synchronization
Third-Party Systems:
- QuickBooks, Xero, or NetSuite for accounting
- Jira, Asana, or Monday for project management
- Salesforce for CRM data
- ADP, Workday, or BambooHR for HR
Integration Quality Matters:
- Are connections real-time or batch?
- Do they require middleware?
- How often do they break?
Request a sandbox environment to test critical integrations before committing.
Step 5: Examine Security Measures
Time data contains sensitive information about employees, clients, and projects.
Data Protection:
- Is data encrypted at rest and in transit?
- Where are data centers located?
- Can you specify geographic storage preferences?
Access Controls:
- Does it support role-based permissions?
- Can you restrict data visibility by department?
- Are there granular sharing controls?
Compliance Certifications:
- SOC 2 Type II for security practices
- ISO 27001 for information security
- GDPR compliance for European data
- Industry-specific standards as needed
Step 6: Calculate Total Cost of Ownership
Sticker price tells only part of the story.
Licensing Costs:
- Per-user monthly or annual fees
- Tiered pricing based on features
- Minimum user commitments
Implementation Expenses:
- Configuration and customization services
- Data migration from legacy systems
- Integration development
Ongoing Costs:
- Support and maintenance contracts
- Training for new employees
- Feature upgrades and enhancements
Hidden Expenses:
- Change management initiatives
- Productivity dips during transition
- Opportunity costs of delayed deployment
A comprehensive TCO analysis prevents budget surprises.
Step 7: Run a Proof of Concept
Never buy based on demos alone. Insist on hands-on testing.
Pilot Program Structure:
- Select a representative user group (10-20 people)
- Choose a realistic timeframe (4-6 weeks)
- Define success metrics upfront
What to Evaluate:
- Actual adoption rates among pilot users
- Time savings compared to current process
- Data accuracy improvements
- User satisfaction scores
Red Flags:
- Vendors who resist pilot programs
- Solutions that work differently in production
- Unexpected limitations discovered during testing
Step 8: Review Vendor Support
Problems will arise. How quickly will they get resolved?
Support Channels:
- Phone, email, chat availability
- Response time guarantees
- Escalation procedures
Knowledge Resources:
- Comprehensive documentation
- Video tutorials and webinars
- Active user community
Account Management:
- Dedicated contact person
- Regular check-ins and reviews
- Proactive feature recommendations
Check recent reviews on G2, Capterra, and Gartner Peer Insights for unfiltered customer experiences.
Step 9: Plan for Change Management
Technology alone doesn’t drive adoption. People do.
Communication Strategy:
- Explain why the change matters
- Address concerns transparently
- Celebrate early wins publicly
Training Approach:
- Role-specific instruction (employees, managers, admins)
- Multiple learning formats (live sessions, videos, guides)
- Ongoing reinforcement, not one-time events
Champion Network:
- Identify enthusiastic early adopters
- Empower them to help peers
- Recognize their contributions
Organizations with formal change management see significantly higher adoption rates and faster ROI realization.
Step 10: Negotiate Contract Terms
Everything is negotiable. Don’t accept the first proposal.
Key Negotiation Points:
- Pricing: Volume discounts, multi-year commitments
- Exit clauses: Data portability, termination terms
- Service levels: Uptime guarantees, support response times
- Customization: Included versus additional charges
Protect Your Interests:
- Insist on data ownership clauses
- Require regular security audits
- Include performance penalties
- Maintain flexibility for growth
Connecting Your SharePoint Timesheet Ecosystem
Isolated systems create information silos. True power comes from seamless data flow across your technology stack.
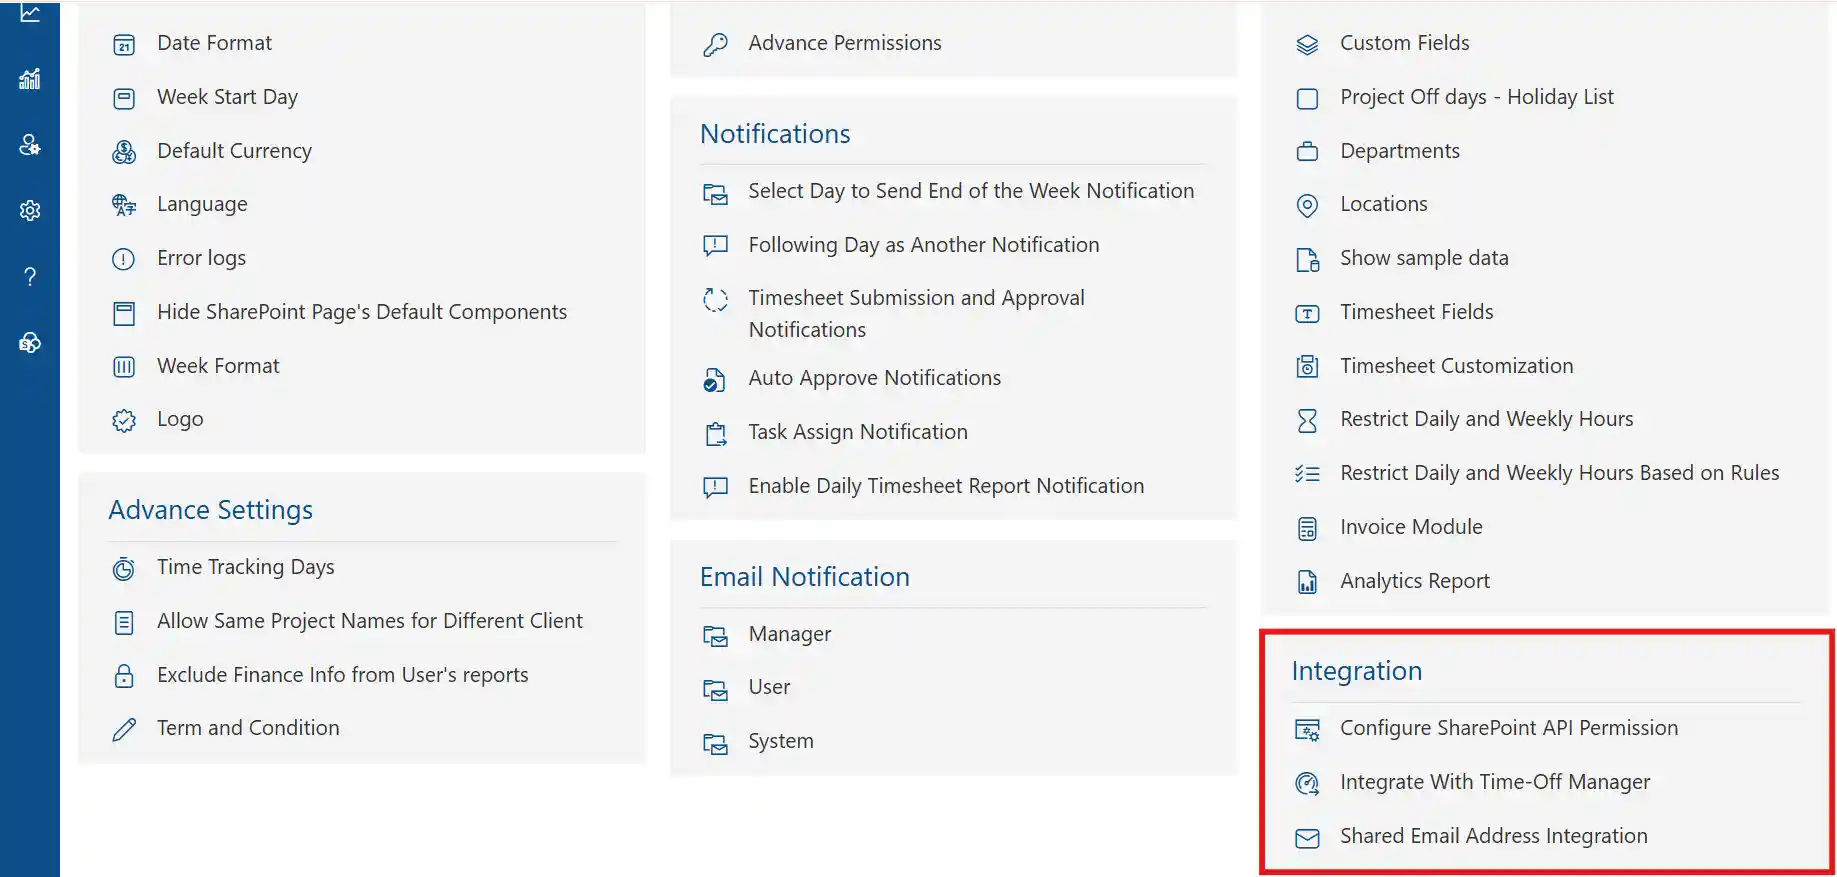
Microsoft 365 Suite Integration
SharePoint timesheet solution lives within Microsoft’s ecosystem. Maximize this advantage:
Microsoft Teams Timesheet
- Submit timesheets directly from Teams channels
- Receive approval notifications in chat
- Access reports without leaving Teams
- Collaborate on timesheet questions in threads

SharePoint Timesheet
- Store timesheet data in SharePoint lists
- Leverage document libraries for supporting files
- Use metadata for advanced filtering
- Apply retention policies automatically
Outlook Calendar:
- Auto-populate entries from scheduled meetings
- Block time for focused work
- Sync deadlines and reminders
- View availability across projects
Power Platform:
- Build custom workflows with Power Automate
- Create specialized reports in Power BI
- Design unique forms with Power Apps
- Extend functionality without coding
Navigating Challenges While Preparing for Tomorrow
No technology implementation is risk-free. Smart organizations anticipate obstacles and position themselves for emerging opportunities.
Current Implementation Risks:
User Adoption Resistance: Change frightens people. Employees comfortable with existing processes may sabotage new systems through passive resistance.
Mitigation Strategy: Involve end-users early in selection. Create champions who advocate for the platform. Demonstrate quick wins that make daily work easier.
Data Migration Challenges: Legacy systems contain years of historical data. Transferring this information without errors or loss proves surprisingly difficult.
Mitigation Strategy: Allocate 30-40% of implementation time to data migration. Cleanse data before transfer. Run parallel systems during transition. Validate migrated data thoroughly.
Integration Complexity: Your technology stack evolved organically over years. Connecting disparate systems with different data models creates technical headaches.
Mitigation Strategy: Map data flows before implementation. Prioritize critical integrations first. Consider middleware platforms for complex scenarios. Budget for custom development.
Scope Creep: Stakeholders request additional features mid-implementation, delaying launch and inflating costs.
Mitigation Strategy: Document requirements formally. Establish change control processes. Defer non-critical features to post-launch phases. Communicate trade-offs clearly.
Security Vulnerabilities: Cloud-based timesheets contain sensitive employee and financial data. Breaches damage reputation and trigger regulatory penalties.
Mitigation Strategy: Conduct security assessments before deployment. Implement multi-factor authentication. Encrypt sensitive data. Train users on security best practices. Monitor for suspicious activity.
Vendor Lock-In: Proprietary platforms make switching costly and painful, giving vendors leverage for price increases.
Mitigation Strategy: Prioritize solutions with open APIs. Negotiate data portability clauses. Maintain export routines. Avoid excessive customization that ties you to specific vendors.
Performance Degradation: Systems that work well with 50 users may struggle with 500. Scalability problems emerge after significant investment.
Mitigation Strategy: Load test with realistic data volumes. Review vendor’s largest customer deployments. Plan infrastructure scaling. Monitor performance metrics continuously.
Compliance Gaps: Regulations evolve faster than software. Today’s compliant solution may violate tomorrow’s requirements.
Mitigation Strategy: Choose vendors committed to compliance. Review update frequency. Understand your industry’s regulatory trajectory. Maintain audit documentation.
Emerging Trends Shaping the Future
Artificial Intelligence Advancement: Current AI suggests timesheet entries. Future AI will understand context deeply, automatically categorizing work, predicting project outcomes, and optimizing resource allocation without human intervention. Research indicates AI-powered time tracking will reduce administrative overhead by 87% by 2028.
Blockchain for Time Verification: Distributed ledger technology could create immutable time records, particularly valuable for regulated industries and contractor payments. Early pilots show blockchain-verified timesheets reduce payment disputes substantially.
Voice-Activated Time Entry: Natural language processing enables hands-free timesheet completion: “Log two hours to client meeting.” Voice interfaces increase mobile adoption rates significantly among field workers.
Augmented Reality Integration: Field technicians wearing AR glasses could log time automatically as they move between job sites, with computer vision identifying tasks performed.
Biometric Authentication: Fingerprint or facial recognition prevents time theft and buddy punching while simplifying login processes. Organizations using biometric time tracking report significant reduction in time theft incidents.
Predictive Analytics Evolution: Machine learning will forecast not just project hours but optimal team compositions, identify burnout risks before they manifest, and recommend preventive interventions.
Autonomous Time Tracking: Imagine systems that track time without manual entry. Background processes monitor application usage, meeting attendance, and document editing, generating timesheets automatically for review rather than creation. Early adopters experience dramatic reduction in timesheet-related administrative time.
Decentralized Work Models: Remote and hybrid work arrangements demand location-agnostic time tracking with sophisticated timezone handling and asynchronous approval workflows.
Emotional Intelligence Monitoring: Future systems may analyze communication patterns and work rhythms to detect stress, recommend breaks, and promote work-life balance.
Quantum Computing Applications: While still emerging, quantum computing could revolutionize complex resource optimization problems, calculating ideal project staffing across thousands of variables instantly.
Preparing Your Organization for Future Capabilities
Build Flexible Foundations: Choose platforms with robust APIs and regular updates. Avoid solutions locked into outdated architectures.
Invest in Data Quality: AI and analytics require clean, consistent data. Establish governance practices now that will support advanced capabilities later.
Develop Change Capacity: Technology evolves continuously. Cultivate organizational agility to adopt new features without disruption.
Monitor Regulatory Landscape: Stay informed about emerging compliance requirements in your industry and geography. Proactive adaptation beats reactive scrambling.
Experiment with Emerging Technologies: Allocate budget for pilot programs testing AI, voice interfaces, or other innovations. Learn through controlled experimentation.
Focus on Outcomes, Not Features: Technology should solve business problems. Evaluate new capabilities based on ROI, not novelty.
Conclusion
AI-powered SharePoint timesheet software transforms time tracking from a manual task into an intelligent, automated process. By reducing errors, speeding up approvals, and providing real-time insights, it helps teams track work hours more accurately and efficiently.
As organizations scale and manage complex projects, automated timesheets become essential for controlling costs, improving productivity, and maintaining compliance. Choosing an AI-driven SharePoint timesheet solution ensures your time data works for you—not against you.


Frequently Asked Questions
How does Timesheet 365 integrate with Microsoft 365 to streamline time tracking?
Timesheet 365 works seamlessly within Microsoft 365, allowing users to track time directly in familiar tools without switching platforms. This reduces manual effort, improves adoption, and keeps time data centralized and secure.
What features does Timesheet 365 offer to help manage employee time effectively?
Timesheet 365 provides automated time entry, approval workflows, project-based tracking, real-time reports, and compliance-ready audit trails. These features help teams track work hours accurately and efficiently.
Can I customize reports in Timesheet 365 to suit my company’s needs?
Yes, Timesheet 365 offers customizable reports that allow businesses to analyze work hours, project costs, and productivity based on their specific requirements. Reports can be tailored for managers, HR, and finance teams.
Is there a mobile app available for Timesheet 365 so employees can track time on the go?
Timesheet 365 is accessible on mobile devices, enabling employees to log and submit timesheets anytime, anywhere. This ensures timely submissions and accurate tracking for remote and field teams.
How does using Timesheet 365 benefit my team compared to traditional timesheets or other solutions?
Unlike manual or spreadsheet-based timesheets, Timesheet 365 automates tracking, reduces errors, speeds up approvals, and provides real-time visibility. This leads to better productivity, improved compliance, and more informed decision-making.
Schedule a free personalized 1:1 demo
By proceeding, you accept Cubic Logics’s terms and conditions and privacy policy


Try It Free, No Obligation


Don't leave yet,
get up to 30% special offer
until 31st March 2026
Enter your business email ID and we will send a personalized coupon code straight to your inbox.
Please provide your contact details, we will connect with you soon!
Please provide your contact details, we will connect with you soon!
By proceeding, you accept Cubic Logics Terms and Conditions and Privacy Policy
Schedule a free personalized 1:1 demo
By proceeding, you accept Cubic Logics’s terms and conditions and privacy policy


By proceeding, you accept Cubic Logics Terms and Conditions and Privacy Policy